Overview
The VIBE desktop is an interactive application that runs directly in your web browser using the OpenOnDemand interface, which connects you to the UBELIX HPC cluster via SLURM-scheduled jobs. In simple terms, VIBE allows you to access a high-performance computing environment for bio-image analysis and other tasks, without needing to install software locally.
This guide will walk you through the initial setup and usage of the VIBE desktop.
What You Need
To use the VIBE desktop you will need:
-
Access to the campus network: You need to be connected to the university network either through EduRoam or using the FortiClient VPN to connect remotely. Find instructions for setting up the VPN client in the IT Services Internet and Network Access documentation.
-
An active UBELIX account: You must have an active UBELIX account to access the VIBE desktop. Follow the steps outlined in the UBELIX documentation on how to access UBELIX.
-
A VIBE project account: To access the full computational resources of the VIBE desktop, you need a VIBE project account.
How do I get a VIBE project account?
-
Follow the instructions on how to get a PAYGO account in UBELIX and mention that you want a project account for the VIBE project. You may need to contact your PI and IT responsible manager of your institute to do this step.
-
Once your project account has been created, you will receive a unique identifier “wckey” for the VIBE project.
-
Contact us with your VIBE project wckey to activate your account.
Getting Access
-
Go to https://ondemand.hpc.unibe.ch. In the navigation bar, click on “My Interactive Sessions”. You will see a list of available interactive applications such as VS Code server, Jupyter Notebook, and VIBE Desktop. Select the VIBE Desktop. Currently there are 3 version of the VIBE desktop available as described below:
- VIBE Desktop 2026xxxx: This is the stable version of VIBE. Contains apps and workflows that have been partially tested by us and we consider them “stable”. Duration and system configuration (hardware) can be adjusted by the user.
- VIBE Desktop Demo 2026xxxx: Session preconfigured with limited resources (4 cores, 16GB RAM, no GPU and 1 hour duration), just for people who want to have a feeling about the VIBE environment, no for serious computation.
- VIBE Desktop testing 2026xxxx: This is the experimental version that contains new apps or features for being tested or requested by the users before they are pushed to the stable version. Duration and system configuration (hardware) can be adjusted by the user.
The VIBE Desktop Demo is available for all all user with access on UBELIX. During the current testing period, the full VIBE Desktop versions (stable and testing) are accessible for free. Please get in touch with us if you want to try the full versions of the Desktop.
Test version only available for short period
The test version of the desktop is free of charge and meant to be used just for testing purpose and will be available for limited period of time.
- Adjust the VIBE system configuration form: Once you select the VIBE desktop application, you will arrive the system configuration form. This is where you will define the parameters for your session. For more details on the configuration options, see the VIBE system configuration form documentation.
Adjust the form accordingly to your use case. As an example, use parameters defined in the table bellow to set your system configuration. Note that currently you can use the VIBE subscription account (or Queue) where you will get VIBE own dedicated resources (hardware) and no waiting time if resources are available. and a free account
| Account | wckey | QoS | GPU Type | Instance Size | Time in hours |
|---|---|---|---|---|---|
| invest | - | job_gpu_vibe | RTX 6000 MIG 24gb | Medium | 1 |
| invest | - | job_gpu_vibe | RTX 4090 | Large | 1 |
| Account | wckey | QoS | GPU Type | Instance Size | Time in hours |
|---|---|---|---|---|---|
| gratis | - | job_gpu_preemptable | RTX 4090 | Medium | 1 |
| paygo | <your_project_wc_key> |
job_gpu | RTX 4090 | Medium | 1 |
Note
The actual limits for VIBE subscribers or the test users can be found on the detailed VIBE system configuration form documentation under the Instance limits section.
Set the system configuration of your VIBE instance by filling the form with the parameters indicated bellow:
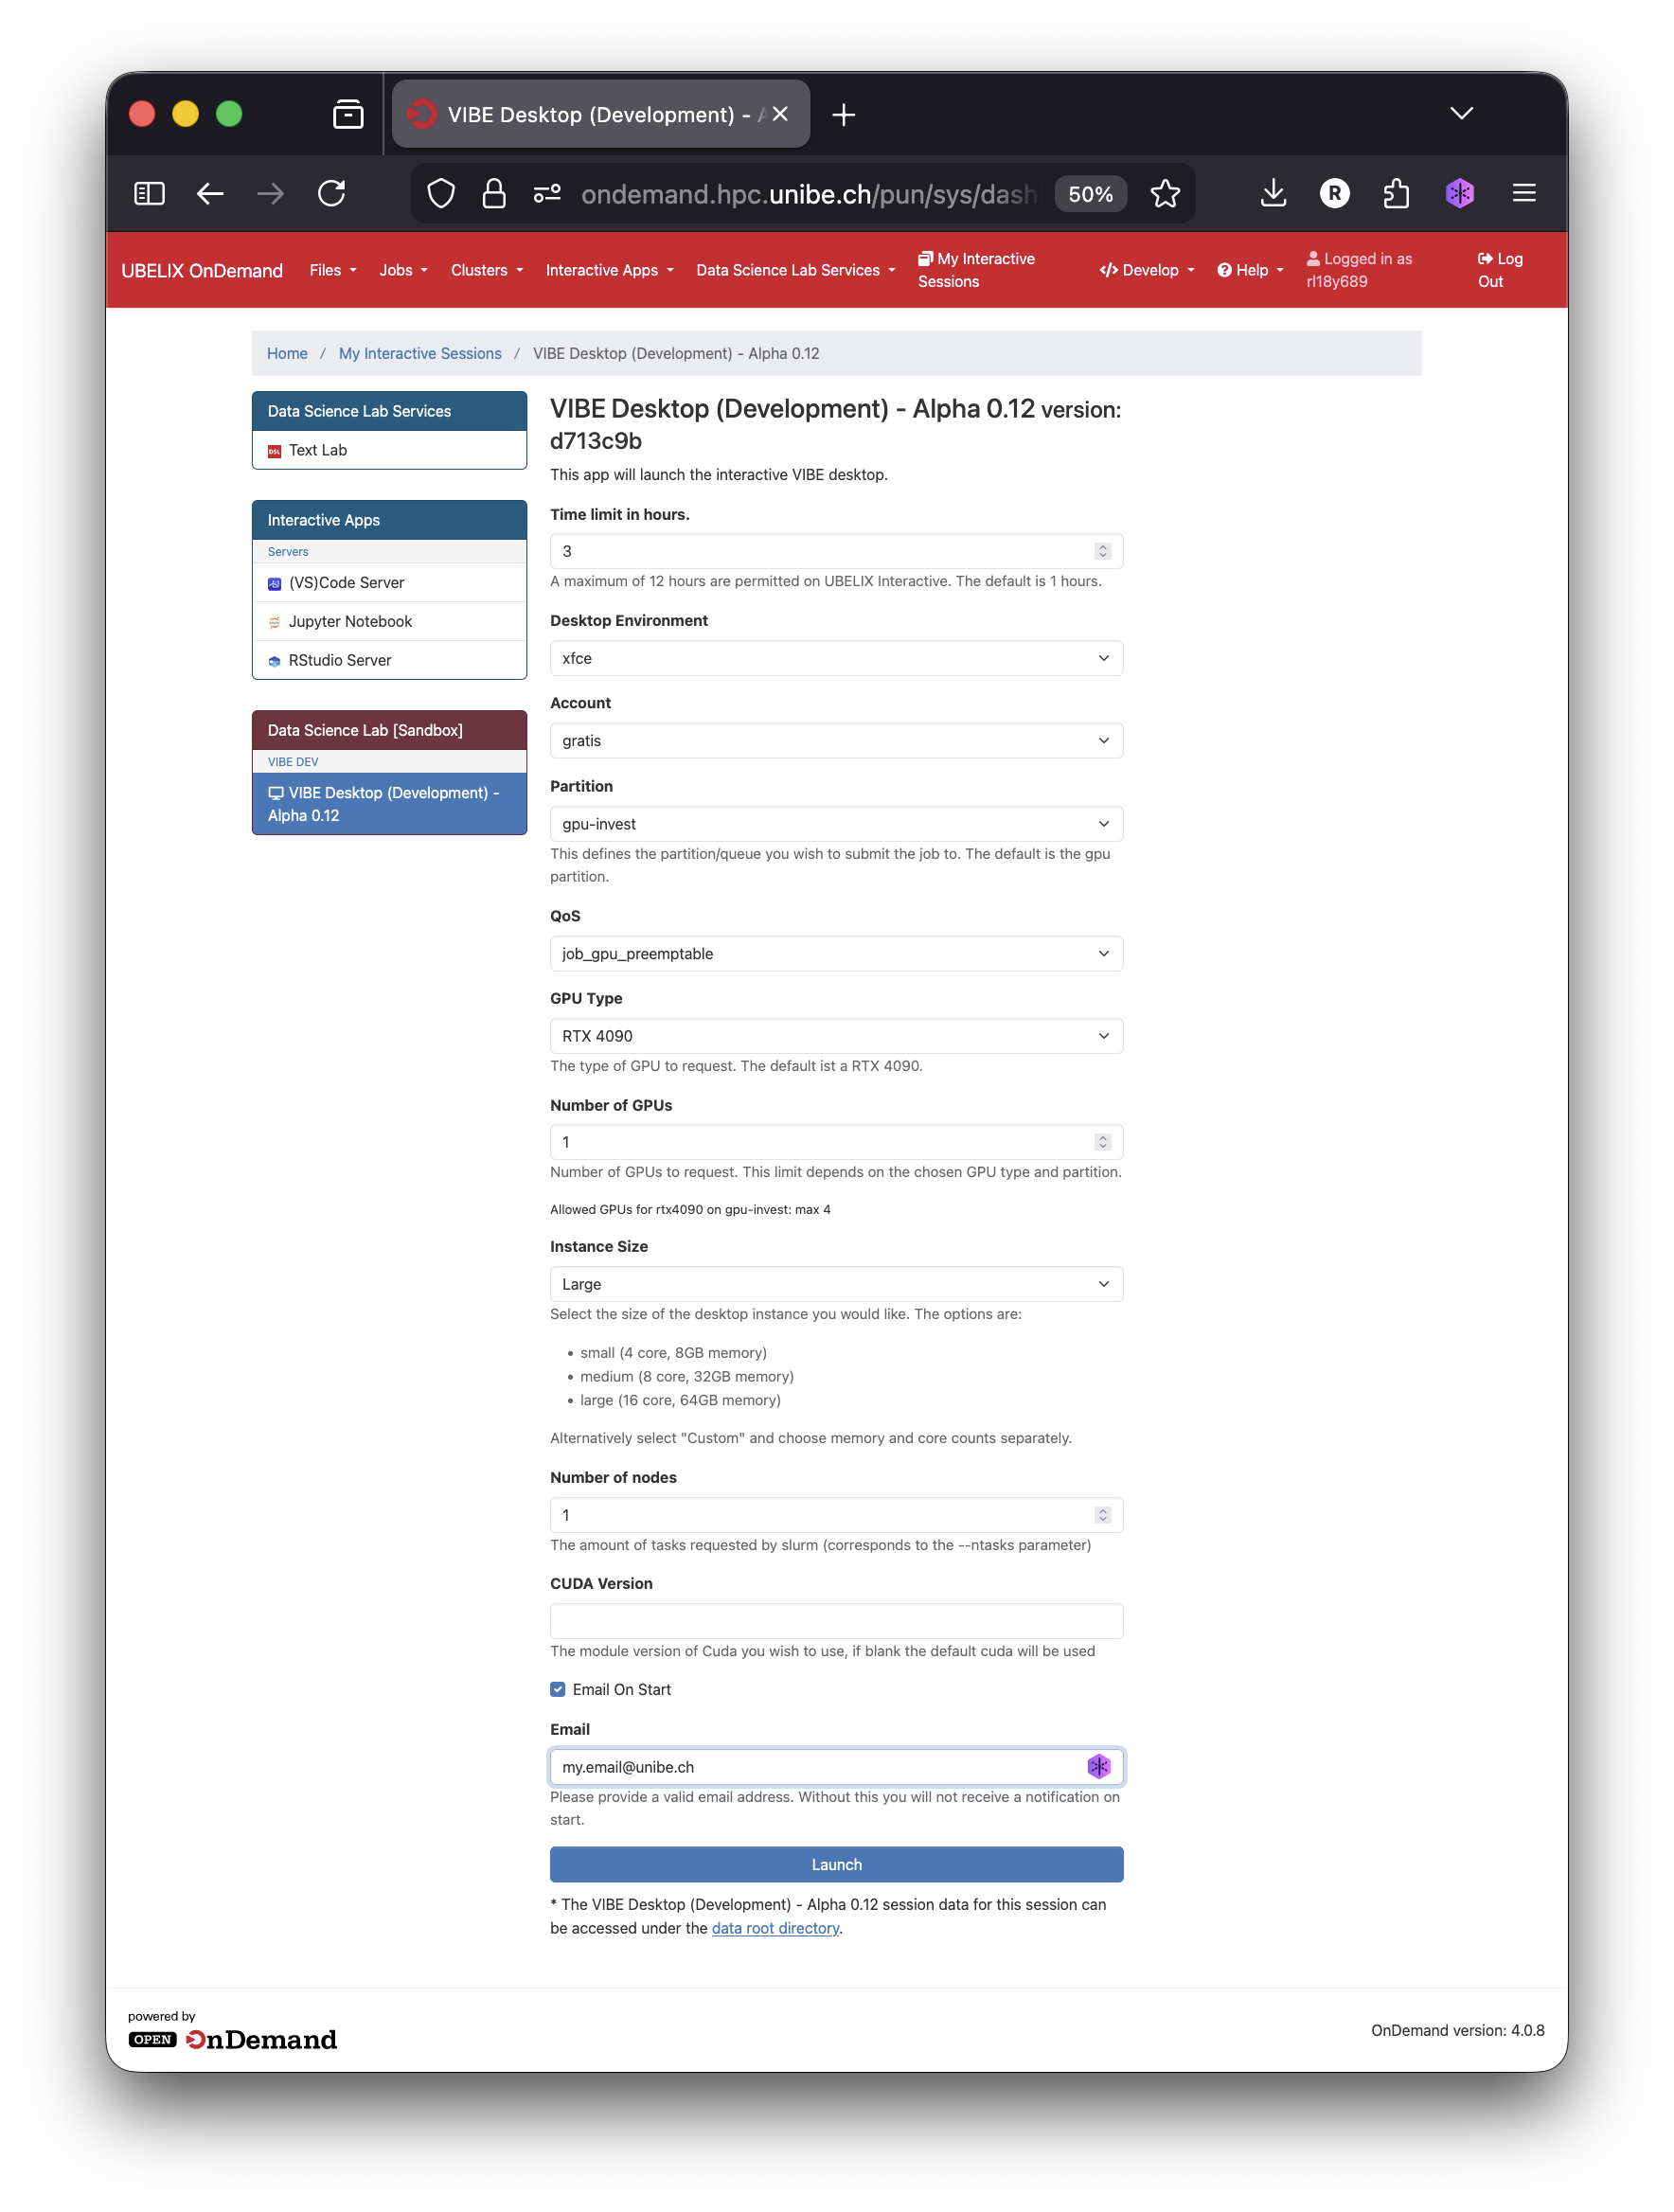
- Launch the desktop: Once you’ve configured your session, click on the blue “Launch” button. It may take a few minutes for your session to start. Please be patient while the system prepares your environment.
Interacting with the VIBE Desktop
The VIBE desktop operates like a typical Linux desktop, providing a familiar graphical user interface (GUI) for browsing files, launching applications, and even navigating the internet. An integrated terminal emulator allows more advanced users to run custom commands or scripts directly from the command line. However, its real power lies in the pre-installed bio-image analysis tools that are ready to use. Furthermore, the vibe desktop can additionally be extended and customized for your specific application or set of applications.
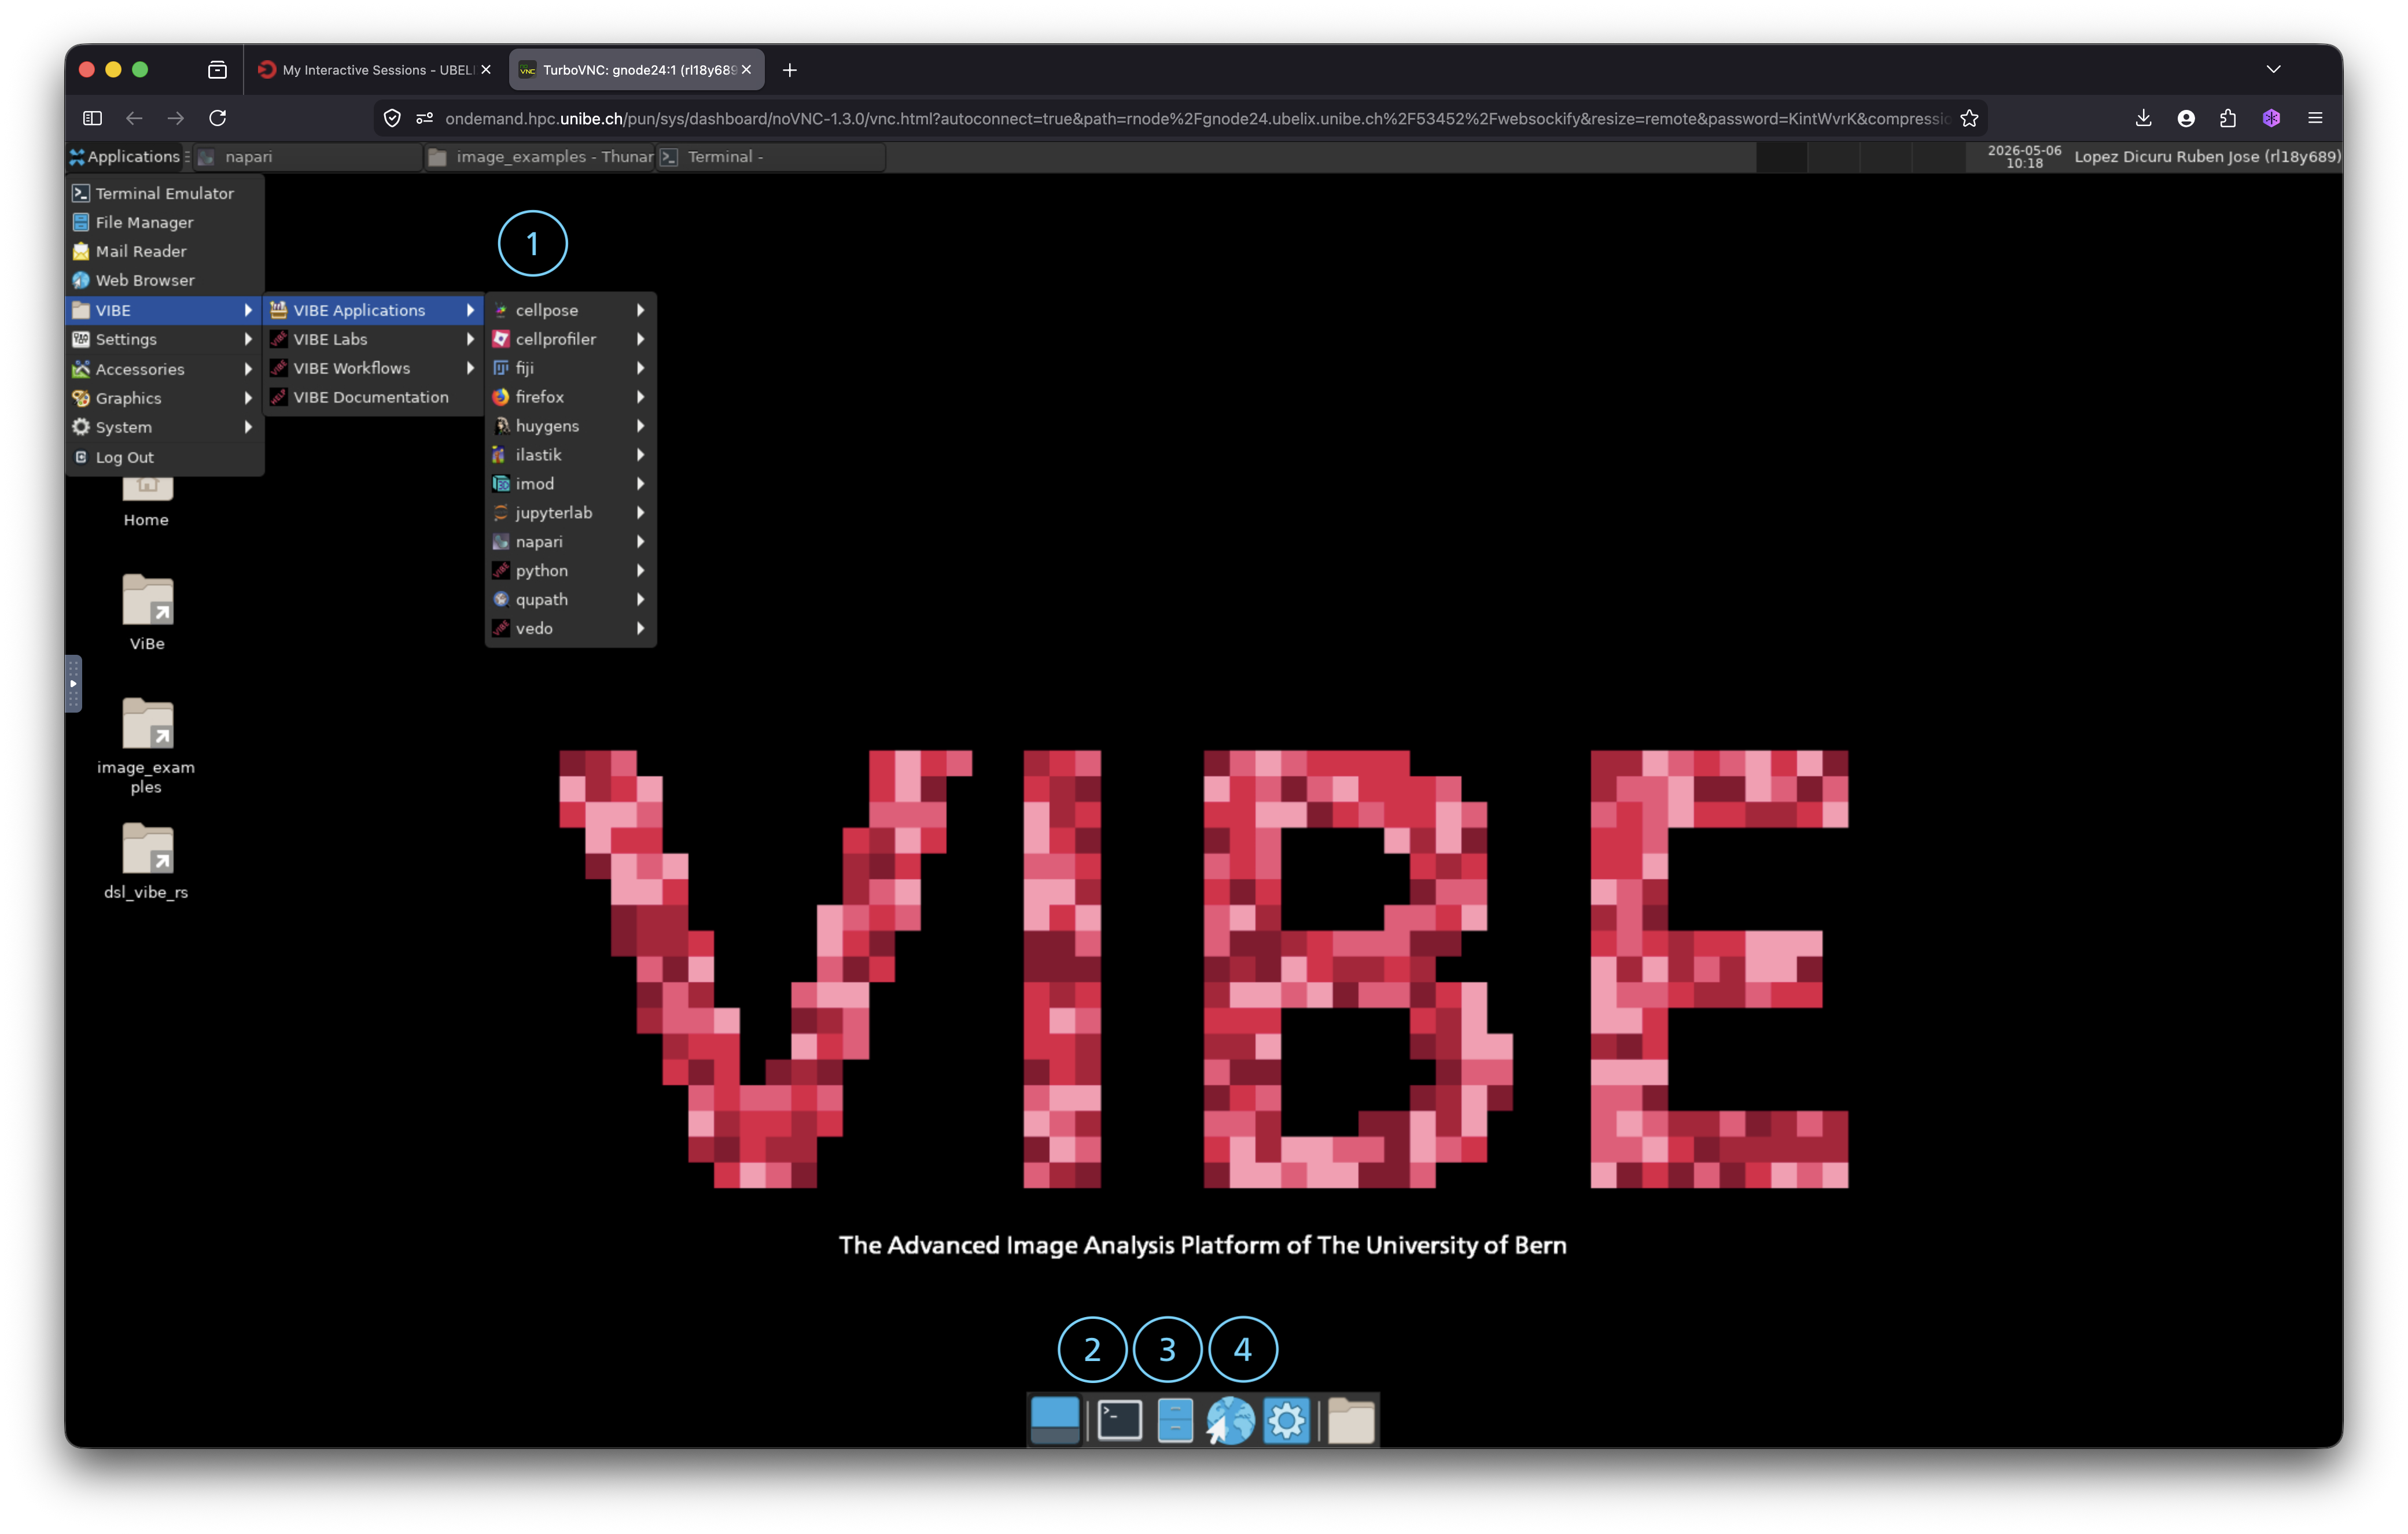
Since VIBE is connected directly to the UBELIX cluster, you have seamless access to research storage. You can easily browse your research files and open datasets directly within the desktop environment.
You can for instance, open a sample image from the research storage and visualize it using Napari, a popular tool for bio-image analysis.
Closing Your Session
There are several ways to close your VIBE session:
- Using the VIBE graphical user interface:
- In the menu bar, click on Applications → Log Out. A confirmation window will appear asking if you want to log out. Click Log Out. Leave the “Save session for future logins” option selected if you want to restore the same applications when you log in next time.
- Via the Jobs Manager tool in OpenOnDemand:
- In the OpenOnDemand dashboard, click on Jobs in the main window and then go to Active Jobs. Find the job running the VIBE desktop by its name
<vibe-desktop-dev>or job ID. To terminate the session, click the red trash can icon under the “Actions” column.
We do not recommend to close your session using the Delete button via “My interactive Sessions” tab, because it will also erase your session logs.
Warning
Important: Simply closing your browser window without properly terminating your session as indicated above may result in unintended billing charges. Always follow the termination steps outlined above.
Note
Persistent Session: Your session is persistent after closing. This means any files, models, images, or other data saved at your work space during your session will be preserved for the next time you log in.